How to Make a Pottery Mug by Hand
Introduction: Why Start with a Mug?
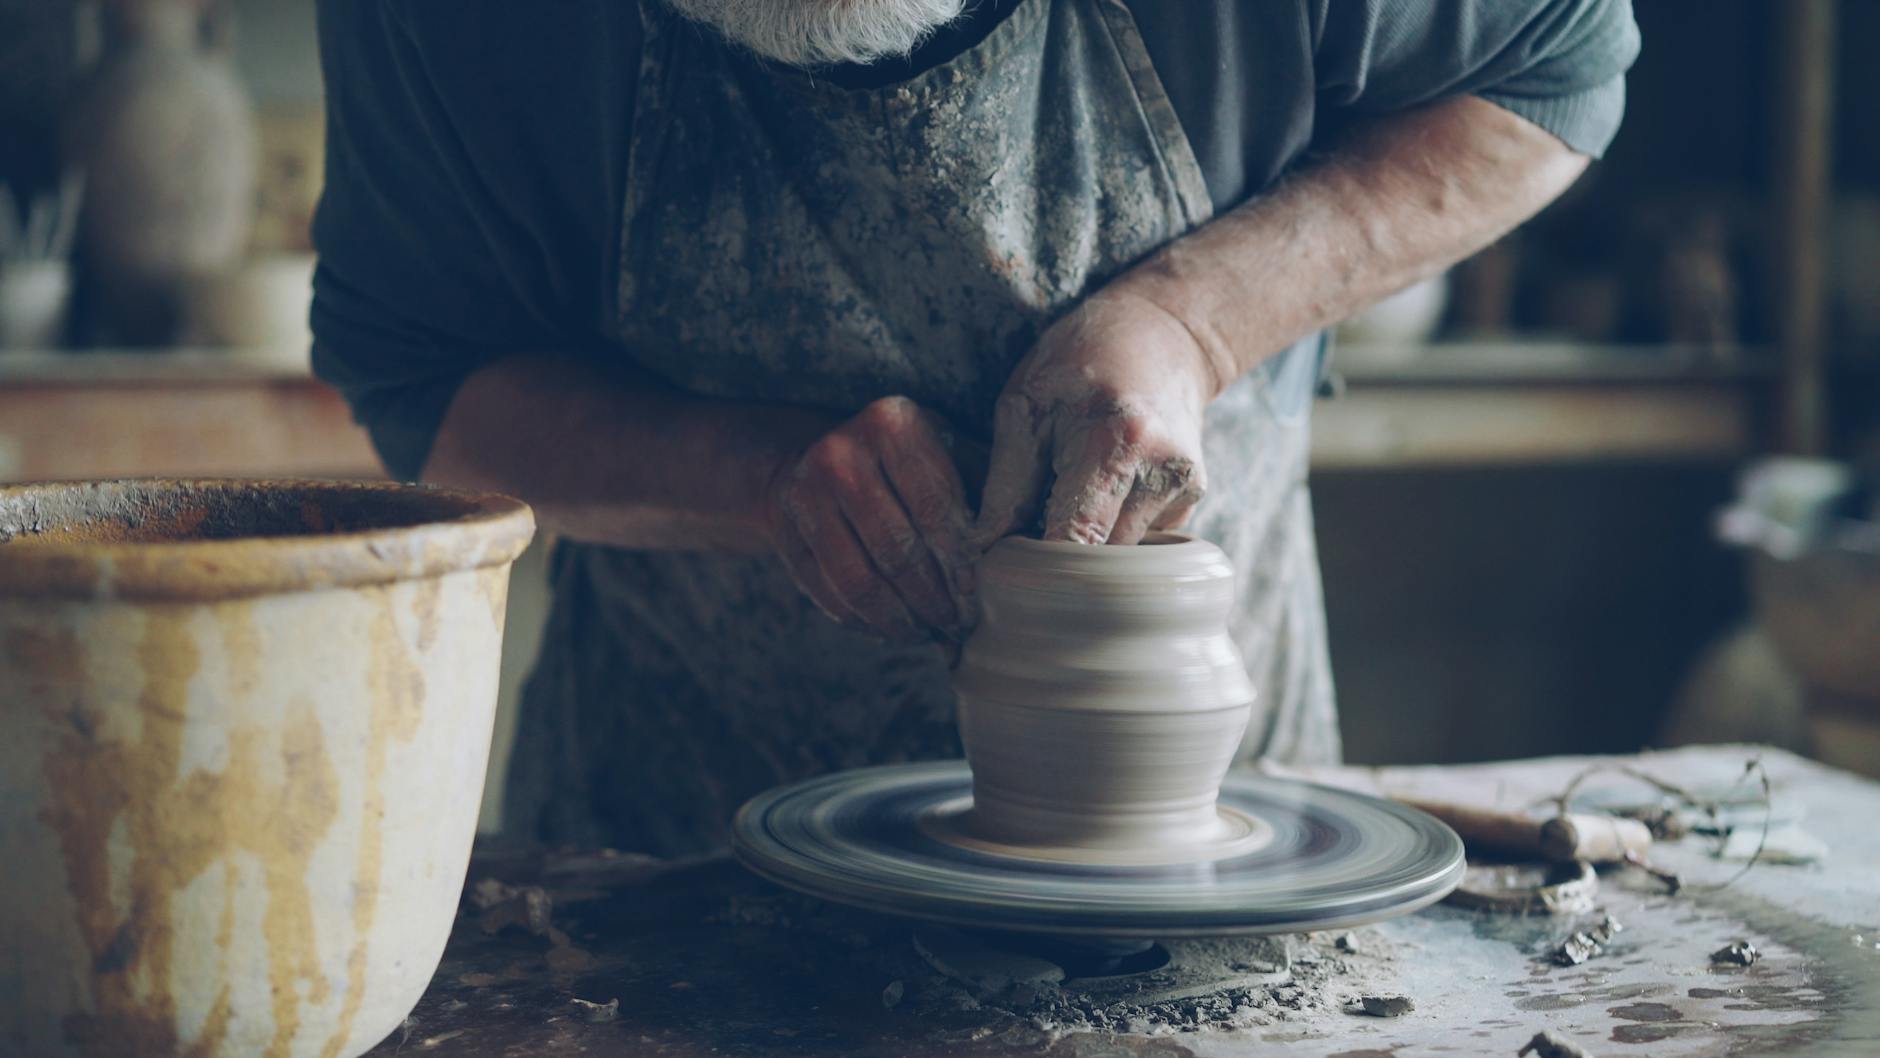
Making your first pottery mug by hand is one of the most satisfying projects a beginner can take on. It is practical, achievable without a potter’s wheel, and produces something genuinely useful at the end of it. Unlike a flat tile or a pinch pot, a mug demands that you think about structure, thickness, and function all at once – and that challenge is exactly what makes it such a brilliant learning project.
Hand building is also wonderfully accessible. You do not need a wheel, a kiln of your own, or years of experience to produce a mug you can be proud of. Community studios across the UK – from the Newlyn School of Art in Cornwall to the Edinburgh Pottery in Scotland – offer hand-building classes and shared kiln access at reasonable cost. Many evening classes run through local councils or arts centres, and some libraries have even begun hosting introductory ceramic sessions. The point is: you do not need to invest a great deal of money to get started.
This guide walks you through the entire process of making a hand-built mug using the slab-building method, which is the most reliable technique for producing a sturdy, even-walled vessel as a beginner. You will learn how to prepare your clay, construct the body, attach a handle, and prepare your piece for firing.
Understanding Clay: Choosing the Right Type
Before you touch a single lump of clay, it helps to understand what you are working with. Clay is a naturally occurring material, and different types behave very differently in your hands and in the kiln. For beginners in the UK, there are three main types worth knowing about.
- Earthenware – This is the most common beginner’s clay. It fires at lower temperatures (around 1000-1150°C), making it compatible with most community kiln schedules. It remains slightly porous after firing unless glazed. Terracotta is a well-known earthenware. It is forgiving, widely available, and inexpensive.
- Stoneware – A more durable clay that fires at higher temperatures (around 1200-1300°C). Stoneware is excellent for functional ware like mugs because it becomes vitrified – essentially non-porous – after firing. Most community studios use stoneware as their standard clay body.
- Porcelain – Beautiful but unforgiving. Porcelain is white, smooth, and translucent when thin, but it cracks easily and warps under beginner hands. Save this one for later.
For your first mug, a grogged stoneware is the ideal choice. “Grog” refers to pre-fired clay particles mixed into the clay body, which adds texture and significantly reduces the risk of cracking during drying and firing. Scarva Pottery Supplies in Northern Ireland, Potclays in Staffordshire, and CTM Potters Supplies in South Wales are all reputable UK suppliers who sell grogged stoneware in quantities suitable for beginners – typically in 12.5kg bags, which is more than enough for several mugs.
If you are attending a class or using a shared studio, the clay will usually be provided or sold on-site. Ask the studio technician which clay body they use and what temperature it fires to – this matters when you come to choose a glaze later.
Tools and Equipment You Will Need
One of the great advantages of hand building is that you need very little specialist equipment to begin. The following list covers everything required for this project.
- A rolling pin (a dedicated wooden one, or a smooth section of PVC pipe works well)
- Two wooden guide sticks or strips of even thickness – around 8mm is ideal for mug walls
- A canvas board or thick fabric surface to roll clay on
- A craft knife or potters’ fettling knife
- A metal kidney or rubber rib tool for smoothing surfaces
- A wooden modelling tool or old butter knife for scoring
- A small bowl of water
- A small amount of slip (liquid clay – more on this shortly)
- A ruler and a pencil
- A cylindrical former – an empty tin can, a tall glass jar, or a short length of PVC pipe wrapped in cling film works well
- A piece of thin foam or a folded cloth to support the mug during drying
You do not need to buy everything new. Car boot sales, charity shops, and kitchen drawers are excellent sources for rolling pins, old tins, and wooden tools. If you are working in a studio, many of these items will already be available to use.
Preparing Your Clay
Clay must be wedged before use. Wedging is the process of kneading the clay to remove air bubbles and create an even consistency throughout the block. Air bubbles trapped in clay can expand during firing and cause your piece to crack or even explode in the kiln – something no studio technician enjoys finding.
The most reliable wedging technique for beginners is called spiral wedging, sometimes called “ox-head wedging.” Place your clay on a clean, non-porous surface and use the heels of your hands to push the clay forward and down in a rocking motion, rotating it slightly with each push. Continue for a full three to five minutes. When wedged correctly, a cross-section cut through the centre of the clay should show no air holes or streaks.
Once wedged, keep your clay in a sealed plastic bag or wrapped tightly in cling film whenever you are not actively working with it. Clay dries out quickly, especially in centrally heated studios or during warm months, and dry clay is much harder to work with.
Making the Slabs
The slab-building method involves rolling out flat sheets of clay and cutting them into shapes that are then joined together. For a mug, you will need three slabs: one for the base, one for the body (which will be wrapped into a cylinder), and one small piece for the handle.
Place a ball of wedged clay on your canvas board. Position your guide sticks on either side – these ensure that your rolling pin rides along them and produces a slab of even thickness throughout. Roll firmly and evenly, rotating the slab occasionally to prevent it from sticking and to maintain an even thickness. Aim for approximately 8mm throughout. Uneven walls will crack unevenly during drying and may collapse in the kiln.
Allow the slab to firm up slightly before cutting. This is called letting it reach “leather hard” – a state where the clay holds its shape when handled but has not dried out fully. Depending on your studio’s temperature and humidity, this may take anywhere from 20 minutes to an hour. On warm days, covering the slab loosely with a thin plastic sheet can help control the drying rate.
Cutting and Assembling the Mug Body
Once your slab is firm enough to handle without distorting, use your ruler and craft knife to cut out the pieces. A standard mug holds around 300ml comfortably. To work out your dimensions:
- Decide on the height of your mug – 9cm to 10cm is a good starting point for a beginner.
- Decide on the diameter – 8cm across is a comfortable width for a mug you can hold in one hand.
- Calculate the circumference of the body: diameter × π (3.14). For an 8cm diameter, this gives approximately 25cm. Add an extra centimetre for the join.
- Cut your body slab to 26cm wide by your chosen height.
- Cut a circular base slightly larger than your intended diameter – you will trim it down after assembly. A rough circle of around 10cm across is fine.
To join the slabs together, you must use a technique called score and slip. This is non-negotiable. Pressing two pieces of clay together without scoring and slipping will result in joins that crack apart during drying or firing, regardless of how firmly you pressed them together in the studio.
Scratch the surface of both joining edges firmly with your modelling tool, creating a cross-hatch pattern across a width of about 1cm. Then apply slip – a thick, creamy mixture of clay and water – to both scored surfaces using your finger or a small brush. Press the two surfaces together firmly and smooth over the join on the inside with a wooden tool or your finger. This internal reinforcement is what gives the join its strength.
Wrap the body slab around your cylindrical former, overlapping the two short ends. Score and slip this vertical join carefully. Support the cylinder on the former while you attach the base: score and slip both the bottom edge of the cylinder and the top edge of your base circle, then press them together and blend the inside join thoroughly. Trim away the excess base clay from the outside with your craft knife once joined.
Remove the former carefully, or leave it in place for an additional 30 minutes if the clay still feels soft. Wrap the base lightly in cling film before inserting the former to make removal easier.
Making and Attaching the Handle
The handle is often where beginners run into difficulty, not because it is technically complex but because timing is critical. The handle and the mug body must be at the same stage of dryness when you attach them. If the body is leather hard and the handle is still soft, the handle will shrink at a different rate and pull away from the body as it dries. If both are at a similar leather-hard stage, the join will be stable.
There are two main ways to make a pulled handle and a slab handle. For beginners, a slab handle is more predictable. Cut a strip of clay approximately 2cm wide and 12cm long from your remaining slab. Score and slip both ends of the strip and the corresponding attachment points on the mug body – one roughly 2cm below the rim, and one roughly 3cm above the base. Curve the strip gently and press both ends firmly into place, blending the joins carefully. Make sure the handle curves far enough from the body that you can comfortably fit four fingers through the gap.
A pulled handle, where you draw out a strap of clay by hand, is the traditional method and produces a stronger, more elegant result once you have practised it. Most
beginners find the slab method more reliable while they are still developing a feel for the clay, so do not be discouraged if your first handle looks a little rough. With repetition, the process becomes instinctive.
Once your handle is attached, set the mug aside to dry slowly and evenly. Cover it loosely with a plastic bag for the first day or two to prevent the handle drying faster than the body, which can cause cracking at the joins. When the mug has reached leather-hard stage — firm to the touch but still slightly cool — you can refine the shape with a metal kidney or a damp sponge, smoothing any uneven surfaces and tidying the base. Allow the piece to dry fully to bone-dry before moving it anywhere near a kiln. Rushing this stage is one of the most common reasons a mug cracks or even explodes during the first firing.
The mug will need to go through two firings in total. The first, known as a bisque firing, takes the clay to around 1000°C and produces a porous, hardened piece that is ready to accept glaze. Once cooled, apply your chosen glaze by dipping, pouring, or brushing, taking care to wipe any glaze from the bottom centimetre of the mug so it does not fuse to the kiln shelf. The second firing, known as the glaze firing, vitrifies the clay and sets the glaze to a hard, waterproof finish. The temperature and atmosphere of this firing will depend on the clay body and glazes you are using, so always follow the manufacturer’s guidance.
Making a mug by hand is a process that rewards patience above all else. Each stage — from preparing the clay to opening the kiln after that final firing — teaches you something about the material and about your own making habits. Your first mug may not be symmetrical, and the handle may sit at a slight angle, but it will be entirely your own. Keep it, use it, and let it remind you how far you will progress with practice.